 IMPORTANT UPDATE – May 2016 – If you’re doing this floor-to-wall repair on your Mirada, then you also need to look at the structural plate attach screws that I also found missing. READ HERE to see that article.
A few months ago I ran across a thread in the Forest River forums where people were having some problems with wall separation on their Georgetown’s. So when this happened on a recent trip, it scared the hell out of me.
“…every time I hit a bump, I’d watch as the instrument panel would stay still, but the entire windscreen and drivers wall would bounce up and down several inches. Thank God we were on a rural road. I slowed way down and prayed this thing would stay together just a few more miles….”
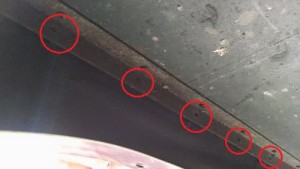
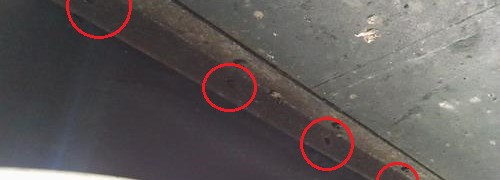
When we bought our “new to us” Mirada last fall, I noticed the drivers side wall would move up and down 1/2 inch, it appeared this had been doing it for some time because there were abrasion marks on the instrument panel where a cup holder that was mounted to the wall was rubbing against the instrument panel. (see the marks in red circle). I just assumed this was normal.
8,000 miles later, all the sudden, the whole front left side, windshields, and drivers side wall seemed like it was bouncing. Every time I hit a bump, I’d watch as the instrument panel would stay still, but the entire windscreen and drivers wall would bounce up and down several inches. Thank God we were on a rural road. I slowed way down and prayed this thing would stay together just a few more miles until we reached the campground.

Looking down at the floor, I could see daylight (about 1/2 inch) between the drivers floor and the drivers wall. (photo above).
I read about this on the Forest River forums and the same thing was happening to me, right now .
This is very, very bad……
As we covered those last few miles I was reviewing in my mind about the problem and solution covered in the forum. I’d probably need to remove the drivers seat so I could get to the floor, the screws and the frame structure. Then drill holes through the frame and replace the screws with bolts and nuts. Ok, not a real big deal, I should have all the tools I need with me and I can get hardware from the local store. IF WE CAN ONLY MAKE IT TO THE CAMPSITE.
When we finally arrived at our overnight stop (we spent three nights there) I climbed under the front of the Mirada to see what all I was going to need to make an emergency repair.
Fortunately for me, the design of my Mirada (20011) is different than the design of the Georgetown. And the fix wasn’t going to be as intense as it is on the Georgetown.
FIXING A SEPARATED WALL ON THE MIRADA
The drivers “deck” floor is about 6 inches higher than the motor-homes floor. The drivers wall is secured to the floor from under the floor.
They used a pieced of angle iron thats screwed to the underside of the floor. They then run 9 screws through the angle iron and into the wall to secure the wall . This can easily be seen by poking your head into the wheel well and looking up at the bottom of the floor.
When I looked at my floor, all 9 screws that should have went through the angle iron and into the wall were missing. When I got a flashlight and looked at the screw holes, I could see where the wall was sagging down about 1/2 inch from where it was supposed to be.
All of the screws on the drivers side had fallen out, so there was no support for the exterior wall on the drivers side.
The passenger side is OK. All the screws are still in the holes.
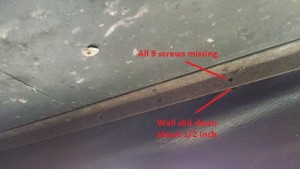
The exterior wall on the drivers side was drooping down about 1/2 inch from where it should be.
From the way the front and windshield were bouncing with the sidewall, I figured that whatever support there was in the front was either flexing a lot, or it was also broke.
I looked all around the front expecting to see something attached to the frame rail, NOTHING, THERE ARE NONE.
The entire front of the motor-home is supported by the side walls, there is no support from the frame or anywhere.
UPDATE (May 2016) – There is additional support. Its a plate that is attached with screws from inside the motor home, If the screws have come out of the floor, then you should also look at the screws in the plate. READ HERE
Based on what I seen, the repair wasn’t anything like what was required on the Georgetown and would be significantly easier.
REPAIR PROCEDURE
Rather than trying to repair the damaged screw holes in the wood and using screws from the inside again, I chose to just drill all the way through and use carriage bolts and nuts to secure the wall to the angle iron.
My intention is that when I get home in a few weeks, I’ll redo the fix in such a way it will look like it came from the factory that way, more on that later.
Here is how I did the repair. (NOTE- The repair now has about 2000 miles on it, we were able to finish our trip with no more problems and the drivers wall is solid.)
1) I put my small hydraulic jack and blocks under the front and jacked the sagging front wall back up until the original screw holes in the wall lined up with the holes in the angle iron.
2) I needed to drill 1/4 inch holes through the wall for the bolts. To mark where to drill the holes, I used a three inch long sheet metal screw. On the inside of the wall, I started the screw in the original angle iron hole and ran the screw all the way through the wall until the screw just started to come out on the outside of the wall. I then removed the screw.
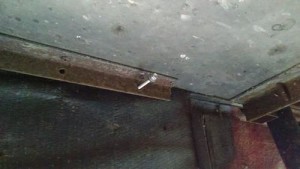
3) Now that I knew where to drill the hole, I then went to the outside, and using a 1/4 drill bit, drilled the hole through the wall and through the angle iron. PERFECT alignment.
I placed one of the 1/4 inch bolts in this hole to hold everything together while I did the remainder of the holes. NOTE – I did not do every hole, I chose to do every other hole and felt this will be more than enough as we are relying on the bolt nut to hold the wall, not a screw.
4) I then repeated the process of using the screw to mark the holes, then drilling the holes.
5) I purchased 2 inch long stainless steel carriage bolts from the local hardware store and put one in each of the holes.

6) When all the bolts were in, I snugged them up a little at a time to pull the wall in nice and slow. After all the nuts were snugged up and the wall had been pulled back in, I tightened the nuts on each of the bolts until the head of the carriage bolt just started to indent the fiberglass.
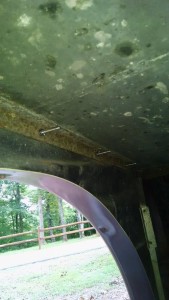
7) Looking from the outside, you can see the 5 bolts. These are not obvious or objectionable.

I plan on doing the passenger side when we get home, and I’ll also do a trim cleanup with the bolts that will make them look factory installed.

Thank you, thank you, thank you! You’re a life-saver!
I was just about to do the same exact repair on my 300QB, although I was considering a) doing it from the top, i.e. adding a piece of aluminum angle next to the driver’s seat and b) using a strip of boat rub-rail on the outside, both to provide compression and make it look pretty, with a bunch of Dicor in the holes to prevent water from coming in. Your point by point description is immensely helpful, and will make it a much stronger fix!
Speaking of which, the previous owner thought that this was a good-enough fix:
Some people just shouldn’t be allowed near tools 🙂
Ben, look underneath at the angle – if the screws that go up and into the floor are OK, you should be good. just do the holes through the wall.
If there are any signs of the floor screws are also working loose, I’d do exactly the same thing with drilling the holes out and installing bolts and nuts thru the floor.
As for your angles. Good try, but I don’t think he identified the problem (look under the floor)
OH YAH – If you got here from the Forest River site, please leave a comment with a link over there pointing to this fix.
Nope, found you accidentally while looking for some Mirada-related thing – can’t even recall what it was, now, but it wasn’t the sidewall problem – and immediately bookmarked the site. Mine has a Chevy 7.4L in it, but everything else is very useful to another Mirada owner. Thanks very much for documenting your fixes!
Wanted to thank you for posting this. I was able to catch my wall before it completely separated. Like you I didn’t think repairing the screw holes would do the trick so I sucked it up and went through the wall with 4 carriage bolts on each side, then repaired holes for the rest of them. I then taped off and painted the bolt heads gloss white and I don’t think anyone will even question them. Great fix!
Thanks, Where did you hear about my site?
john
You sent me here from IRV2 when I had AC problems
IMPORTANT – If you did this repair, you may also want to inspect the F53 structural plate to see if the screws also fell out of it, I bet they did..
http://www.2001mirada.com/additional-repair-to-drivers-side-wall/
..
John Mc,
Thanks for the excellent description on fixing my Mirada 2000. I wish I could have seen your site before I allowed it to get so bad. Right now after a 2800 mile trip from Ohio to California, I now have a separation from the front passenger side extending beyond the entrance door. I can’t believe how bad our Interstate roads have become!
I too had this squeak , and was reading about another fellow on here that used 3m 5200 adhesive , being quite familiar with marine products I did the same I removed the 9 lag bolts bought over sized ones of the same length , wedges back the black metal flat plate (was easy to do ) squeezed as much 3m 5200 as I could behind the plate and also filled all the bolt holes with the same.
put the new lags in and they grabbed ….. now I bought the reg 3m 5200 which has a drying time of 5 to 7 days I left it for 10 days.
they also make a quick set 3m 5200 that set up in 24 hrs.
took the motorhome out this morning … not a squeak … will see if works and for how long .. if squeak comes back I can then bolt it through.