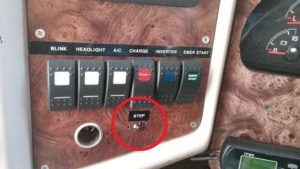
 For those of us who don’t have automatic steps, or only have a mechanical step, the most common question in the RV community has got to be: “Is the step still out?”
Although we check and double check to make sure the step is retracted before getting under way, this question always seems to be in the back of my mind, especially after a quick stop at a Rest Area or a fill-up at the gas station. We can’t quite see the step in the mirrors, so to make sure, we usually go back to the step switch and hold it in for about 5 seconds to make sure the step is retracted.
Wouldn’t it be nice to have a indicator light on the dash that warns when the step is extended? Read on…
To turn a warning light on and off, I needed a switch that could tell if the step was up or down. It had to be reasonably inexpensive, yet robust enough to survive the horrible environment just behind the front tire. Unfortunately, good quality switches aren’t cheep, that’s why this project has been on the planning shelf for so long.
Several weeks ago, while working on a project at work, the though came to mind that a proximity switch should work perfectly for detecting the step. Proximity switches are like miniature metal detectors. When something metallic is close by, they turn ON or OFF, depending on the style. Since a proximity switch has no moving parts (like a mechanical switch) they tend to be a lot more robust in harsh environments.
I started searching for an inexpensive proximity switch. BAM – I found exactly what I was looking for, in a place that I never expected to find it.
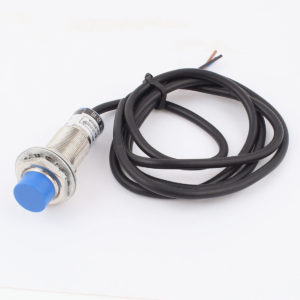
WALMART –
Part # LJ18A3-8-Z/AY
Inductive Proximity Sensor Detection Switch
DC PNP NC 8MM 10-30V 1M
(Available via Walmart $8.99 each)
You won’t find this sensor on the shelf at the local Walmart Super Center. Instead, you’ll need to order it on their website. You can have it delivered to your house or a local Walmart store. CLICK HERE
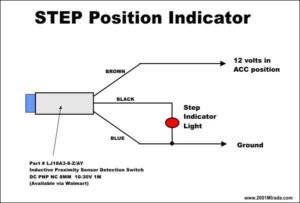
This prox is a PNP – Normally Closed prox, it works like this:
When the prox doesn’t see metal, the prox’s switch is closed (light turns on). When the prox see’s metal, the switch opens (light turns off). The prox can control a circuit up to about 0.3 amps (300ma), so be careful not to attempt to control a large light or other big load.
MOUNTING THE PROXIMITY SWITCH
I made a angle bracket and drilled a hole that the prox would fit into. I then loosely install the prox into the bracket, leaving about 1/2 inch of threads for later adjustment..
From underneath, look at how the step operates. You need to find a metal part of the step that moves when the step is extended / retracted. The prox is then mounted and positioned so when the step is retracted, it will see this metal piece, when the step is extended, the prox no longer sees the metal piece.
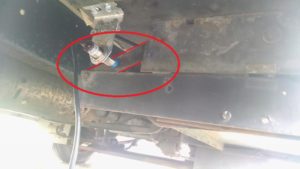
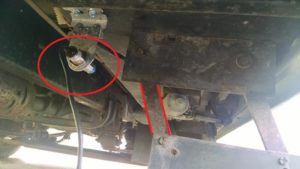
On my step, when the step is retracted, the prox is positioned so it can see one of the steps swinging metal braces. This brace swings back and up when the step is retracted. When the step is extended, the metal brace swings down and out, and the prox no longer see’s it. (see photos)
I screwed the bracket into the underside of the wooden step, toward the back. This way when we are traveling, the retracted step will help protect the Proximity switch from water, rocks, etc that gets kicked up by the front tire.
WIRING THE INDICATOR LIGHT
I installed a 12 volt LED panel light on the instrument panel, and wired it so the only time the circuit is active is when the engine is running or in ACC position.
If the step isn’t retracted, the light turns ON.
If the step is retracted, the light is OFF
Total cost for this project was about $15. It took a couple hours to make the brackets, mount everything, run the wiring, and hook everything up.
Regardless if your step is electrical or mechanical, or if you have a motorhome or a travel trailer, this simple and inexpensive indicator should work for you.

